
Change from Windows to Mac

Windows has been around for a very long time more than 23 years, with Windows 3.1 celebrating its 20th anniversary this week. Most of us are used to using Windows but for almost the same amount of time another system has been available Apple Mac.
With the growing problems for Windows security, virus, trojans, and mal-ware many people consider moving to an Apple computer as they are considered more secure and more reliable. Weather this is true or not is open to opinion, but very few Mac users ever switch back to a Windows PC.
Apple Mac’s do have some big advantages, they are slightly better built than PC’s and do have more security built into the Operating system, but they are considerably more expensive to buy and an adjustment in thinking is required if you’re switching from Windows 7 to Mac. It is also a misconception that Apple computers are immune to virus’s and security problems, unless they are constantly kept up to date they have similar problems to Windows PC’s.
So just how big an adjustment is required to move from a Windows PC to a Mac. It’s probably the equivalent to sleeping on the opposite of the bed rather than changing from writing with your right hand to your left. So while there is some learning to do, it should not be too challenging.
This is not a comparison between the two operating systems, there are whole web sites devoted to this. Instead this will cover the basics from opening a file/folder, where do files and apps go, and what to expect instead of ‘My Computer’.
Windows Taskbar & Start Menu –> Mac Dock & System Menu Bar
As a Windows 7 user, you’ve grown comfortable with finding and accessing applications from the Start Menu and pinning your frequently used items to the Taskbar. In effect, the Start Menu is where you have app access from, and the Taskbar is where the currently running applications reside. In Mac you will meet the Dock.
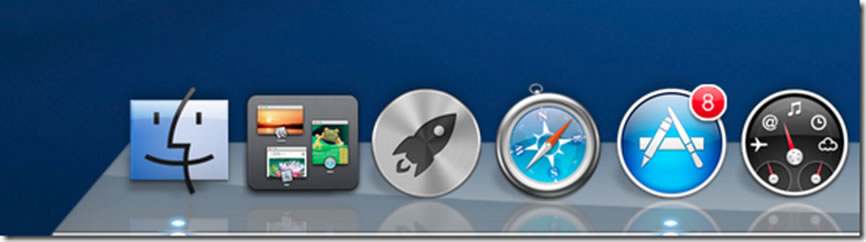
The Dock is like a dashboard (not to be confused with the Dashboard for Widgets); icons for applications like the Finder, the Launcher, Mission Control and Safari can be found here. All these are default Mac applications that will help you perform some very basic functions. As in Windows 7, you can add your frequently-used apps to the Dock. Apps are listed to the left, folders and minimized windows go to the right. You will find three folders on the Dock – Applications, Documents and Downloads.

At the top of the desktop, you will see a horizontal bar known as the System Menu Bar; this bar is omnipresent, regardless of which app or utility you launch. The menus on this bar, however, will change to reflect those of the active app.
![]()
You will find that that the menu listed on this bar change as you click different app windows. If you have Safari window (or Chrome or Firefox) active, the menu bar will show options that you would normally see on the Title bar in Windows. Unlike windows, where the menu options for each application, program or utility is within its own window, app menus are always listed on this bar when the app window is active. As a rule, whenever you want to view settings for any app, select it, so that it becomes the active window, and the menu bar reflects its menu items. The preferences that appear in the system menu bar usually belong to the active app, and not the system itself.
What’s Up, Dock?
As corny as that line is, you need to know what those icons on the Dock do, if you want to do more than just admire your Mac. Finder is a Mac system utility for exploring files on your Hard Disk, much akin to Windows Explorer in Windows 7. The Finder icon is best described as a two faced blue guy. Click the icon to launch the Finder.

The Launchpad app makes it easy for you to view all installed apps on your Mac, use the mouse wheel to move across screens and view different apps. Click on any app to launch it. Once an app is launched, its icon will appear on the Dock.

In case you do not see the Launchpad icon on the Dock, visit the Applications folder to find and launch it. Once launched, right-click the app, and from the Options submenu, choose Keep in Dock to pin the app to the Dock. To remove an app from the Dock, drag & drop it on to the desktop and it will vanish in a puff of virtual smoke.
You will also see the Safari icon, a navigation compass, that will launch Apple’s default web browser. On the far right of the Dock, you will see the Trash Can which is Mac’s equivalent to Window’s Recycle Bin and works similarly. You can send items to the Trash Can from the right-click context menu, or drag & drop them on to the icon in the Dock.
Windows Start Search & Mac Spotlight
In Windows 7, the start menu has a search feature that lets you find folders, files, applications and system utilities by typing in their name. To do the same in Mac, click the magnifying glass icon on the top right of the system menu bar and start typing in a file or app name. The Spotlight feature will search as you type, and list all matches. The search is universal, i.e., it will search for apps, files and folders.

Control Panel & System Preferences
Control Panel is a massive feature in Windows 7, and on Mac, you get System Preferences. To access System Preferences, click the Apple icon on the system menu bar and select System Preferences. You can set system time, volume, display, networks, user accounts, parental controls, printers etc, all from here.

Scrolling
While you will be able to use any ordinary mouse with your Mac, you will notice from the get go that scrolling is reversed, i.e., scrolling the mouse wheel up actually scrolls a page down, and scrolling the mouse wheel down, scrolls a page up. Don’t think your mouse is broken, or that you might have plugged it in the wrong way – that’s just how things are on a Mac. You might also have noticed that the close, minimize and maximize buttons are all located on the upper left of windows, and not the the upper right as in Windows 7.
Opening A File
Selecting a file and hitting the return (enter) key will not open a file, it will ready the file for renaming, to open a file, either double click it or select it and hit Command + O.
Viewing Hard Disk And User Files
Unlike Windows 7, you will not see options to view “My Computer”, in order to view the Hard Disk, open the Finder menu on the System Menu Bar and open Preferences. From the General tab, select which items you would like to view on your desktop. Check the Hard Disks options and you will be able to view all disks connected to your Mac.

You will find four folders; Applications, System, Library and Users. The Applications folder will show all installed apps on your Mac, the Library folder will list folders created by Apps. The System folder is where files for system utilities and apps are saved. This is where you will find the extensions folder for Safari.

Apps
When you move to a Mac, you move to an OS that relies on apps for any and all functions that aren’t basic. Installing apps in Mac isn’t difficult, it is just different. In Windows, applications are in EXE format, in Mac they are DMG. There is seldom an installation procedure involved. A majority of Apps are installed from the Mac App Store, an app that resides on the Dock and requires you to sign in with your Apple ID.
How to Install an App
Search or browse for apps in the Mac App Store, to download a paid app, you will have to associate a credit card with your Apple ID. To download a free app, simply click where it says Free, the button will turn green to read Install and will ask you to sign in to your Apple ID. Once you’ve signed, download will begin. Download and installation are synonymous here. Once download is complete, click the app icon in either the Applications folder or in the launch pad.

The Mac App Store isn’t the only place you can download apps from, as developers host apps on their websites, and the only difference you will experience when downloading apps like this is, that they will rest in the Downloads folder and you will have to manually move them to the Applications folder. In further, rarer cases, the developer might have zipped the file, which will unzip via the default archiving utility.
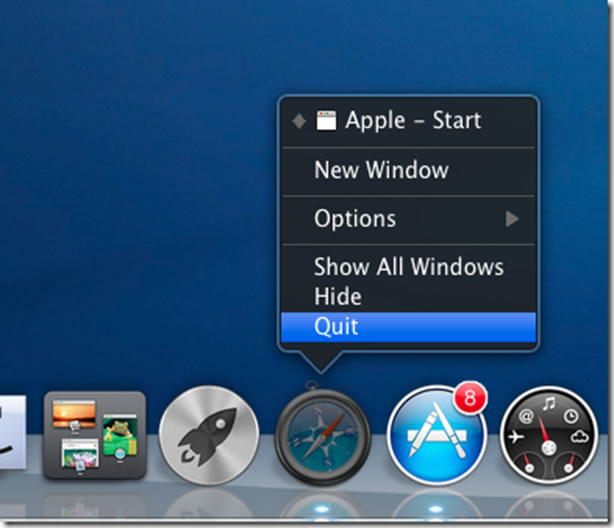
Quitting & Closing An App
In Windows 7, you can exit an instance of some apps without closing. For example, you can close and image you were editing in Paint, without exiting the program itself. Similarly, in Mac, closing and quitting are often separate functions. Case in point, you might exit Safari (or Chrome, or Firefox), but it will continue to run, unless you quit them by right-clicking the app icon in the Dock and selecting Quit.
Force Quitting Apps
Mac doesn’t have a Windows Task Manager equivalent, so if you want to quit an app that’s stopped responding, hit Command + Option + Escape, select the app you want to quit from the window that opens, and click Force Quit.

Mission Control & Window Management
You will find that windows minimize individually in Mac, and are not grouped as they are in Windows 7. That might make it difficult to organize your workspace, but things work differently in a Mac. Windows are best organized using Mission Control. This is a Mac feature that lets you create virtual desktops that you can switch to. More specifically, if you have trackpad, you can use the three finger swipe gesture to switch to a desktop. Each desktop remembers which windows you were working in, and you can move windows from one desktop to another. To use Mission Control, click the icon in the Dock, and use the plus sign in the far right corner to add as many desktops as you like and drag & drop a window on to another desktop.

Hopefully, after reading this brief guide, you will have an idea of where to look when you want to access a file/folder, or change a system preference. Mac is, in no way, any less of an OS than Windows, but getting used to a new OS or finding out where everything is, can often be frustrating. Mac, if nothing else, is very different from Windows, and these are just a few things you should know before you go digging deeper.
References:
Orignal Atricle from PCword.com